Waitlisting for a course
The automated waitlist process provides students the opportunity to enroll in closed sections of a course as space becomes available. When a space becomes available, the student will receive an email notification through their email that a seat is now available and that the student is now eligible to register for the course within the time frame indicated in the email. The student must then login to his or her MyCCRI account and register for the available seat. If the student DOES NOT register within the specified date and time, the available seat goes to the next person on the waitlist. If the student who originally received the notice wishes to go back on the wait list, they will have to re-add themself to the waitlist to get another chance.
Please check your email frequently during the registration period. Waitlists will be purged at the start of late registration (students will be dropped from the courses they are waitlisted for that semester).
| Instructions | Screenshots |
|---|---|
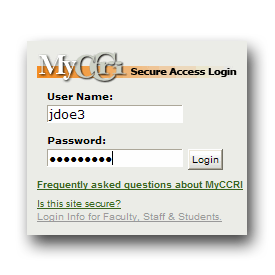
Step 1Login to your MyCCRI account |
 |
Step 2Click on the For Students tab |
 |
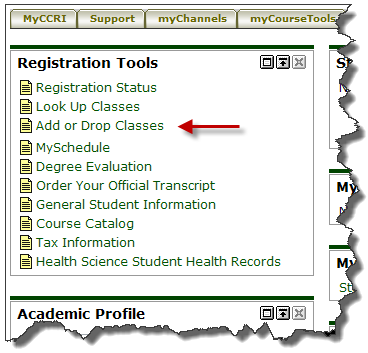
Step 3Under Registration Tools click on Add or Drop Classes |
 |
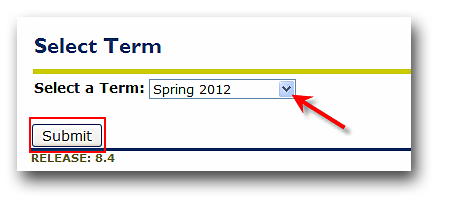
Step 4Select the term you wish to register for and click Submit |
 |
Step 5Scroll down to the Add Classes Worksheet. If you know the 5 digit CRN for the course, enter it into the box provided for the CRN and click Submit Changes. If you do not know the CRN continue to Step 5 otherwise go to Step 7. |
 |
Step 6If you do not know the CRN for the course, click Class Search. Select one Subject then click Class Search. |
 |
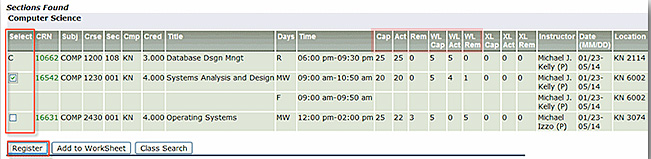
Step 7Scroll down through the courses. You will see 6 columns that indicate available seats and waitlisted seats:
Click in the box in front of the CRN to add the course (C indicates a closed class) and then click Register or Add to Worksheet. If there is no box or a C appears, the class is closed and you cannot be waitlisted. |
 |
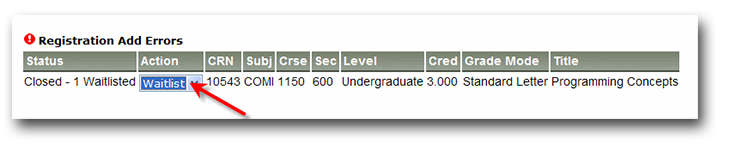
Step 8If the class is full you will get a Registration Add Error. Select Waitlist from the drop down box and then click the Submit Changes button. |
 |
Step 9You will receive an email notification in your email account that an open seat is now available and that you must take action within 24 hours. You will have 24 hours to register for the course. The time period will be indicated in the email. If you do not web register at that time, the seat will go to the next student on the waitlist. |
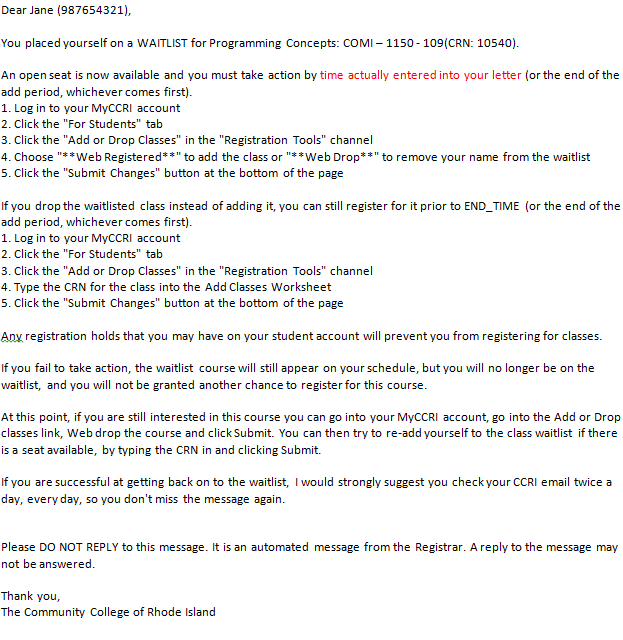 |
Step 10Once you receive the email, you will need to follow the instructions below or in the email to either register for the course or drop the waitlisted class.
|
|
| After submitting your changes you will be able to view the classes for which you are registered and any other(s) you may be waitlisted for. |